Turn your first Balut into income
Your first goal in Steal A Balut is not simply to break open or find a Balut. It is to finish one safe trip: reach a target, hatch or steal the Balut, escape with the resulting pet, return to your own Base or Bakuran, and complete the placement interaction. The placement is the point at which the pet can begin contributing Cash; the detailed farm placement and income guide covers that next step.

Before leaving, identify your own fenced Base and the route back to it. Then treat the first trip as a practice run rather than a shopping trip. Learn where the target is, which path lets you retreat, and what feedback confirms that the pet is now active. Once that first pet is producing Cash, use the income panel and the Store to decide whether your next bottleneck is movement, tool Power, or active capacity. Use the upgrade comparison when you are ready to match the purchase to that bottleneck.
A successful beginner target has three visible outcomes:
- You obtain a usable pet rather than only discovering a Balut.
- You return to your own Base without losing the carried target.
- You place or activate the pet and can verify its current income in your pet or Base interface.
The exact pet name, Cash rate, and item cost can vary by the current game state. Read your own panel instead of copying a number from a video or an older list.
How a Steal A Balut run moves forward
The game is built around a repeatable risk-and-income cycle. Your Base provides the destination, the target area provides the Balut or pet to obtain, and the return journey is the dangerous part. After the pet is placed, Cash gives you a reason to make another trip and a way to improve the next one.
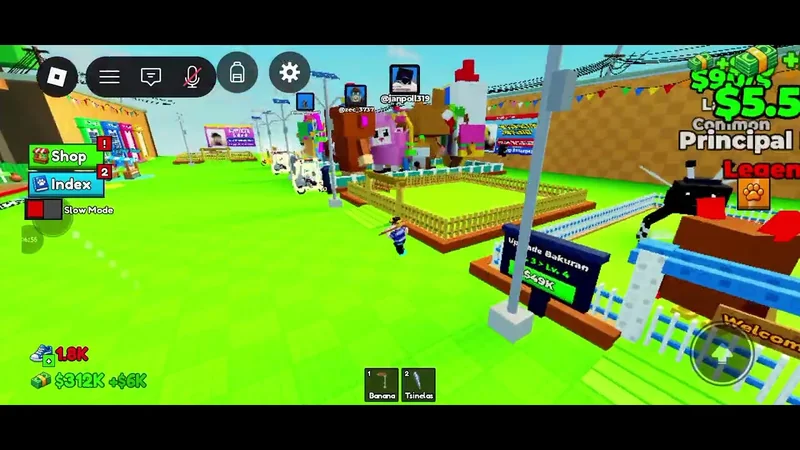
The practical state changes are:
- Prepare: locate your Base, check your equipped pet and current Cash, and choose a reachable target.
- Approach: travel to the target area without spending your limited resources on an upgrade you do not yet need.
- Obtain: use the available interaction to hatch, break open, or steal the Balut. The interface may describe targets as eggs, chickens, ducks, or Baluts; follow the current interaction label.
- Carry and escape: once the target is obtained, leave the danger area. Guards or other threats matter most during this return stage.
- Verify the return: reach your own Base and complete the placement interaction. Arriving nearby is not the same as putting the pet into the Base.
- Earn and improve: check the pet's displayed income, then spend only when a purchase addresses the reason your next run is failing.
This structure is repeatable, but each run can have a different decision. A slow player may need a safer route before a faster tool. A player with a safe route but full active capacity may benefit more from an additional equip slot. The cycle therefore moves from a completed return to a targeted upgrade, not from blindly buying the most expensive item.
Baluts, Bases, and the panels that matter
These are the systems to understand before chasing rare targets:
- Balut Hatching: A Balut is the starting object for obtaining a collectible pet. Reach the target and use the available hatch or break-open interaction. Hatching alone does not start income; the pet still has to reach your Base and be placed.
- Stealing: Stealing is the obtain action that removes a target from its area and gives you something to carry home. Plan the retreat before interacting, because the trip is only useful if you can complete the return.
- Escape and guards: Escape is the risk stage after the obtain interaction. Avoid turning around to collect another target when you are already carrying one. If a guard or threat interrupts the run, use the route you practiced rather than improvising in the danger area.
- Base or
Bakuran: This is your destination and the place where an obtained pet can be placed. Look for the placement feedback before assuming the run is complete. - All Pets: Use
All Petsto view, equip, unequip, or replace available pets.Equip Bestis an equipment shortcut; it is not the same as theIndex, and it does not by itself prove that a new pet is producing Base income. - Index: The Index tracks collection entries and helps you see what you have or have not obtained. Use it when choosing a collection target, not when checking which pets are currently active for income.
- Cash income: A placed and active pet can provide Cash over time. Compare the rate shown for your own pet, since similarly named or similarly ranked pets can show different values and old examples are not a reliable price or income table.
- Store and upgrades: The Store, including the
Martilyo Shopwording used by the game, is where you inspect available tools, pets, movement improvements, and capacity options. ToolPower, movementSpeed, Cash price, and Robux price are separate values; do not treat one as a substitute for another.
The game also exposes capacity choices such as +1 Equip. Buy one only after checking whether your current active slots are the actual limit. A larger collection in the Index does not automatically mean every pet is active or earning.
Your first safe Balut run
Use this sequence once before committing to expensive upgrades. Each step has a checkpoint so you know whether to continue or recover.
- Start at your own Base. Find the fenced area or
Bakuranthat belongs to you and note a route from it toward the target area. The checkpoint is being able to recognize the destination on the way back. If you cannot identify it, stay near the Base and learn the landmarks before taking a target. - Check your current state. Look at your Cash, equipped pet, active capacity, and the Store's currently available options. Do not use a reported price such as 28,000, 50,000, or 800 as a fixed requirement; those are examples from changing gameplay footage. The checkpoint is a clear decision about whether you are going out empty-handed or using an upgrade already available to you.
- Choose one reachable Balut. Walk to a target you can approach and leave without needing an unconfirmed unlock. The checkpoint is the live hatch, break-open, or steal prompt. If the object does not show the expected interaction, do not assume that every Balut uses the same action; follow the label currently shown by the game.
- Complete the obtain interaction. Hatch or steal the target and wait for the visible state change that confirms you now have a pet or carried objective. The checkpoint is the target no longer being merely an object you found. If no pet or carried state appears, check the interaction again instead of starting the return early.
- Commit to the escape route. Leave the target area immediately and keep the route to your Base in mind. The checkpoint is reaching the safer path away from the guard or danger area while retaining the target. Do not detour for a second Balut until you have completed one successful return.

- Return to your Base. Travel to your own fenced area rather than another player's property. The checkpoint is the Base placement prompt or equivalent feedback. If you reach the wrong area, back away and use the route you identified in step one; do not leave the pet in an unverified state.
- Place and verify the pet. Complete the placement interaction, then open
All Petsor the relevant Base display. The checkpoint is that the pet is listed as equipped or active and that an income value is visible. A successful escape without placement is only half a run. - Choose the next improvement. Compare the displayed Cash rate with the time and risk of another trip. If movement is the problem, investigate Speed; if an interaction or tool is the problem, inspect Power; if your active list is full, consider an equip-slot purchase. The terminal decision is to repeat the safe route or buy the smallest upgrade that fixes the observed bottleneck.
Follow a Balut run from stealing to Base income
This moment supports the run sequence by discussing stealing eggs or chickens, getting a Farm, spawning Baluts, and checking the Store before improving the return loop.

Once this sequence works, you can use the Index to choose a collection target and All Pets to manage the active roster. Keep those goals separate: a rare entry may help collection progress without being the best current income choice.
Spend Cash only after the return works
Prioritize the systems that remove the failure you can actually see:
Player calculator
Steal A Balut cash purchase budget
Check how many purchases a cash balance can cover while keeping a reserve.
Estimated result
- Cash available after reserve
- —
- Purchases at this price
- —
- Unspent cash above reserve
- —
- Shortfall for the target
- —
- Purchase goal
- —
Assumptions and sources
Assumptions
- The entered price is the current price for one purchase and does not forecast later changing prices.
- Cash values use the same currency and are rounded for display only.
Sources
- https://stealabalut.wiki/calculator · reviewed 2026-11-04
- Secure the route first. A stable escape path is more valuable than speed you cannot use effectively. Practice the return while carrying a target.
- Confirm income second. Place the first pet and read its current Cash rate before planning a purchase. This gives you a real baseline for your account.
- Fix the largest bottleneck. Choose Speed when the route is safe but too slow, tool Power when the current interaction is the obstacle, and active capacity when you have more useful pets than equipped slots.
- Keep collection separate. Use the Index to plan what to seek next, but do not sacrifice a reliable income pet merely to fill an entry.
- Treat codes as optional help. Codes may offer Cash or Speed, but reported code strings and rewards can change. Verify a code in the game's own redemption interface and do not assume a code removes guard risk or unlocks a Store item.
Review Steal A Balut codes and their rewards
This moment supports the optional-codes guidance by reviewing three active Steal A Balut codes and reporting Speed and Cash rewards without treating them as permanent guarantees.

Use these recovery pairs when a first run goes wrong:
- You find a Balut but cannot return: abandon the extra target and practice the route empty-handed. On the next attempt, start with one reachable Balut and leave immediately after the obtain interaction.
- You reach the Base but income does not appear: reopen
All Petsand the Base display, then complete the placement or equip interaction. Do not buy an upgrade until you have confirmed whether the pet is active. - You spend on the wrong upgrade: keep the purchase as information about your bottleneck, then use the next successful Cash payout to address the missing system. Do not infer that Speed, Power, and Cash price are interchangeable.
- You cannot tell whether a pet is collected or active: use the Index for collection status and
All Petsfor equipment status. Check the income display separately. - A code fails: re-enter the current code exactly as shown in the game's redemption panel and check the response. If the panel rejects it, stop treating the reward as guaranteed rather than trying unrelated Store requirements.
The beginner milestone is one verified income-producing pet and one route you can repeat. After that, every new Balut, equip slot, tool, or Speed purchase should make the next safe return easier or make the Base income more useful.
First-time Steal A Balut questions
Does hatching a Balut immediately give Cash?
No. Hatching or obtaining the Balut gives you a collectible pet or carried objective, but the beginner flow is not complete until you return to your own Base and place it. Check the active pet and displayed income after placement.
Should I use the Index or All Pets to manage a new pet?
Use the Index to track collection entries and All Pets to equip, unequip, or replace active pets. They answer different questions, so use the income display to confirm whether the pet is contributing Cash.
What should I upgrade after my first successful return?
Choose the upgrade that matches the problem you observed: Speed for a safe but slow route, tool Power for an interaction bottleneck, or an equip slot when useful pets exceed your active capacity. Check the current Store panel because prices and available items can change.